| Driver Utility |
At the end of this tutorial, you will have a simple Windows forms application that lets you list units and drivers that are associated with your Fleet account.
This topic contains the following sections:
Open Visual Studio and create a new C# or VB.NET Windows Forms application. Name the project 'DriverUtility'.
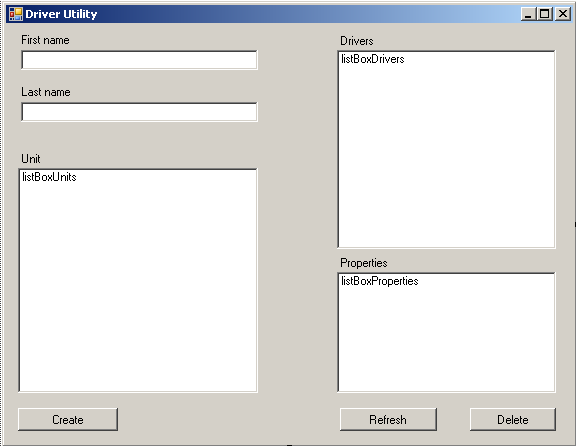
Open Designer View and modify the form to match the screenshot below. The textboxes are named textBoxFirstname and textBoxLastname. The buttons are named buttonCreate, buttonRefresh and buttonDelete. The listboxes are named as shown in the screenshot.
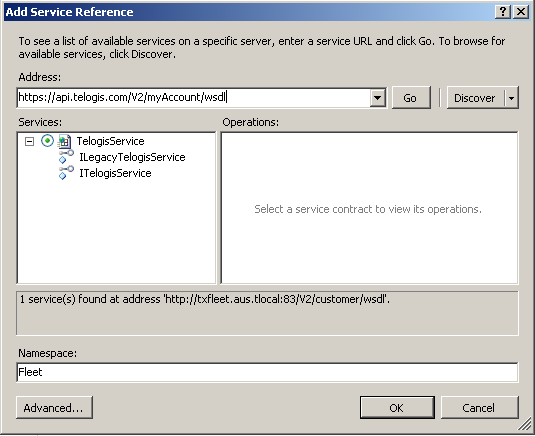
In Visual Studio, ensure that your project has a reference to the Fleet Web Service API:
- In Solution Explorer, right-click your project and select Add Service Reference... (.NET 2: then click Advanced (at lower left), and click Add Web Reference).
- For the Address (.NET 2: API URL), enter https://<customer>.api.telogis.com/V2/<customer>/wsdl, where <customer> is your account name.
- Click Go.
- Change the Namespace (.NET 2: Web reference name) to Fleet, then click OK.
Begin by adding the following members to the Form1 class. These will be used to hold a local copy of your Fleet drivers and units. To access the Fleet Web Service, use the LegacyTelogisServiceClient (.NET 4) or the LegacyTelogisService (.NET 2) object.
.NET 4
Add a load event to your form. Modify the load event to match the code snippet below.
|
.NET 4
// When the form loads we configure the Fleet Web Service and login
// to the web service
private void Form1_Load(object sender, EventArgs e) {

SetButtonsEnabled(false);

// avoid HTTP417 errors caused by some proxies
System.Net.ServicePointManager.Expect100Continue = false;

// Create a TelogisServiceClient for logging in
Fleet.TelogisServiceClient tsclient = new Fleet.TelogisServiceClient();

// Log in and obtain an authentication token
string authToken=tsclient.Login(String.Format("{0}:{1}", customer, user), pword);

// Now create the LegacyTelogisServiceClient for accessing the API
service = new Fleet.LegacyTelogisServiceClient();
header = new Fleet.AuthenticationHeader();
header.SessionID = authToken;

RefreshContents();
SetButtonsEnabled(true);

}
The SetButtonsEnabled method is listed below and simply enables or disables the buttons on the form. This prevents interleaving of commands which would cause an exception.
The following method uses the API to retrieve and store an array of units (vehicles) and drivers. Units are loaded into listBoxUnits and drivers are loaded into listBoxDrivers.
.NET 4
// Refresh the Drivers/Units listboxes by retrieving
// data from the Fleet service
//
private void RefreshContents() {
SetButtonsEnabled(false);

listBoxDrivers.Items.Clear();
listBoxProperties.Items.Clear();
listBoxUnits.Items.Clear();

// get drivers
drivers = service.ListDrivers(header, 0, 128);
foreach (Fleet.Driver d in drivers) {
String row = d.Name + " [" + d.ID + "]";
listBoxDrivers.Items.Add(row);
}

// get units
units = service.ListUnits(header, 0, 128);
foreach (Fleet.Unit u in units) {
String row = u.Name + " [" + u.ID + "]";
listBoxUnits.Items.Add(row);
}

SetButtonsEnabled(true);
}
Connect this method to the refresh button's click event using the following method:
In this tutorial, we'll use the FirstName and LastName properties to identify drivers. Both of these properties are recognized by Fleet.
Most Fleet objects have as a member an array of Property objects, which are key-value pairs. Whenever you search for objects, you can typically filter the results on these properties. |
Wire the method below to the driver's listbox SelectedIndexChanged event. This method will load the properties of the selected driver into the bottom-right listbox.
Because the drivers listbox is a simple visual representation of the drivers array, we can use the selected index of the listbox to map straight to the Driver object that we want to get the properties for.
// Updates the properties shown in the DriverProperties listbox
// when a driver (in the Drivers listbox) is selected

private void listBoxDrivers_SelectedIndexChanged(object sender, EventArgs e) {
listBoxProperties.Items.Clear();
Fleet.Driver d = drivers[listBoxDrivers.SelectedIndex];
foreach (Fleet.Property p in d.Properties) {
String row = p.Name + " = " + p.Value;
listBoxProperties.Items.Add(row);
}
}
Before you delete a driver (or a sub-user associated with a driver) from Fleet, it is important that six months of ELD reports for the driver or sub-user are downloaded. This includes drivers and sub-users who no longer work for the organization. Once you delete a driver or sub-user, this action cannot be reverted, and reports for that driver or sub-user can no longer be generated. |
Wire the method below to the delete button's click event. This method will delete the currently selected driver (from the top- right listbox) from your Fleet user account. Important points to note are:
- Because the drivers listbox is an exact visual representation of the drivers array, we can use the selected index of the listbox to map straight to the Driver object that we want to delete.
- Driver objects are identified by their ID property. This ID is returned from the Service.CreaterDriver() method and can be accessed through each Driver object's ID property.
.NET 4
Wire the following method to the create button's click event. This method first checks that a last name and first name has been entered and that a unit has been selected. This method then creates a new driver using the API.
In this tutorial, we'll
- force the user to select a unit to associate with the new driver
- construct a tag from the driver's first and last names
|
.NET 4
// Creates a new driver, and performs simple input validation

private void buttonCreate_Click(object sender, EventArgs e) {
if (listBoxUnits.SelectedIndex != -1
&& textBoxFirstname.Text.Length > 0
&& textBoxLastname.Text.Length > 0) {
Fleet.Property fname = new Fleet.Property();
fname.Name = "FirstName";
fname.Value = textBoxFirstname.Text;

Fleet.Property lname = new Fleet.Property();
lname.Name = "LastName";
lname.Value = textBoxLastname.Text;

String tag = (String)fname.Value + (String)lname.Value;
long unitid = units[listBoxUnits.SelectedIndex].ID;

service.CreateDriver(header, tag, unitid, 0, new Fleet.Property[] { fname, lname });

textBoxFirstname.Text = textBoxLastname.Text = "";

RefreshContents();
} else {
MessageBox.Show("New driver must have two names and a unit");
}
}
That completes the Driver Utility sample project. The next sample project demonstrates how to export markers to Fleet from a CSV file.